Tuesday, December 30, 2008

Let's Set The Record Straight

I realize this post will probably offend, but it needs writing nonetheless.

Recently, in an online photography forum, I ran across a thread asking if Photoshopped images should be considered in a different class from non-Photoshopped images. To be fair, the person who originated the thread was asking if obviously manipulated images should be posted to a photography gallery. But as the thread evolved people began to ask and answer the broader question. It was some of those answers that were more than a little upsetting.

In any discussion such as this one, or when discussing film vs. digital (which came up in this thread), someone invariably invokes the name of Ansel Adams as the pinnacle of "traditional photography", and as a figurehead for nobility behind the camera. This thread was no different, and indeed his spirit was summoned. Repeatedly. And, if I might say, incorrectly.

Ansel Adams was a huge innovator in his own right, and championed many ideas that at the time were pooh-poohed as vulgar, shocking, useless, or otherwise unacceptable. A good case in point: When Adams started out, view cameras and box cameras were the only show in town. Adams gravited toward the view camera because of the motions it offered, but to the best of my knowledge he never shut out any form of camera or format for the negative. When Agfa began producing cameras to hold their 35mm movie film so people could use it to take still shots, Adams picked one up early on. Various people gave him a hard time about it, but he persisted and took some remarkable photographs using that "pedestrian" gear.

This was far from an isolated incident. It was a pattern throughout his career. He was one of the field testers for Polaroid's products, and was a personal friend of Edwin Land. He also tested Kodak's first color film products, though he admitted the strength of his work lay in black and white. And he was a big proponent of image manipulation.

I'll say that again just so people are clear: He was a big proponent of image manipulation. This is made abundantly clear in his numerous writings. In his book, "Examples - The Making of 40 Photographs" he goes so far as to show his initial contact print from his negatives, his test prints, and his final print along with the dodge and burn notes for several of his photographs. Contrast adjustment? Yes. Dodging and burning? Yes. Tonal range compression and expansion? YES. (And you thought HDR was new... nope.) If it could be done in the darkroom, it was fair game.

So what about digital vs. film? Unfortunately Adams didn't live long enough to see digital hit mainstream, but in the introduction to "The Camera" (I think... my copy went wandering when I loaned it out a few years ago) he clearly stated that he was excited by the prospect of digital cameras and digital photography. I don't think he ever referred to it as digital imagery as so many film proponents do. Digital photography.

So please, stop invoking the name of Adams unless you really want his opinion. He made it pretty clear over and over and over.

"I have been immensely pleased with many creative explorations I have seen; they are evidence of great imagination and the awareness of enduring qualities of art. I often observe that the more "far-out" any work appears at first, the more exciting and valid it may prove to be."

-- Ansel Adams - "Examples: The Making of 40 Photographs"

I began to write a response to the thread in the forum, but in the end I erased my reply and moved on. Enough passionate photographers for one day. One more wasn't going to change anyone's opinion or do any more to provide an answer to the original question. As a friend of mine put it, "Opinions are like assholes. Everyone's got one." I'm no different.

- Tom

Wednesday, December 17, 2008

Anti Bokeh

Bokeh (derived from Japanese, a noun boke ぼけ, meaning "blurred or fuzzy") is a photographic term referring to the appearance of out-of-focus areas in an image produced by a camera lens using a shallow depth of field.[1] Different lens bokeh produces different aesthetic qualities in out-of-focus backgrounds, which are often used to reduce distractions and emphasize the primary subject.

Wikipedia
Almost everyone who has put a camera in manual mode, or who has used a manual-only camera, has played with depth of field. A shallow depth of field produces the bokeh effect described above. A wide depth of field brings more of the frame into acceptable focus.

But there are limits to what you can do with an aperture ring. Close down too much, and diffraction at the aperture starts to work against you, blurring out the picture. So what do you do with a shot that has a lot of range to cover?

One solution is to use a large format camera with motions and take advantage of the Scheimpflug Principle. I won't go into the details here, but the upshot is that you can tilt your plane of best focus by tilting the lens or film holder. If, say, you're photographing a field of flowers stretching from your feet out to infinity, it would be impossible to bring the entire field into sharp focus using the aperture ring alone. But you could tilt your lens and shift your plane of best focus until it coincided with the field of flowers. The entire field would be in focus, but everything above it or below it would begin to go out of focus. This is partially the reason why photographers like Adams and Weston were able to get incredibly sharp sweeping landscape shots, and it's the reason why many landscape photographers continue to use large format cameras to this day. (Including me!)

But what if you need everything above and below that field of flowers to be in focus as well? You can still stop down, and broaden your depth of field somewhat above and below. But again, there are limits. Eventually diffraction begins to work against you, and you start to fuzz out the overall image. Where can you go from here?

Back in 2000, I ran across GRAFICA Obscura, a web site written by Paul Haeberli of SGI. It described a method of taking a stack of images shot at different focus distances, and selecting only the sharpest bits of each image in order to combine them into a single, sharpest image. Paul used an edge-finding filter to build his layer masks, a technique that worked, but not perfectly well. I made some attempts to use his technique, but I ran into a number of problems and no real successes.

Skip forward to 2008 when I swapped out my Nikon Coolpix 5600 camera for a Canon A650 IS. One of the reasons I chose the A650 was that it could run CHDK, a scripting language that can run on top of the Canon firmware in many of their compact cameras. I was interested in running CHDK for several reasons, one of which was a bracketing script that was far more flexible than the bracketing available in the Canon firmware. Among other things, it let you bracket your focus.

All of this would've put me in no better position than I was already in with Paul Haeberli's technique, but times change. At some point in those intervening years, Alan Hadley wrote a package called CombineZM that automates and improves on the technique Paul Haeberli described. The combination of CHDK's bracketing script and CombineZM's ability to stack the images yields a tool to get infinite depth of field out of a scene.

Anti-Bokeh

Optics Bench

It's not for every photographer, and certainly not for every situation. But it's one more tool to add to the tool belt. And now that that tool is there, it's something to think on when heading out into the field.

Tom

Monday, December 1, 2008

The Photo Competition

Last year I found out that one of the local galleries hosts an annual black and white photography competition. This year I decided to enter. It's been one of those "learning experiences" we're told to appreciate. Phrased a different way: it's been painful.

Rules for photo competitions always look straightforward until you actually try to submit something. This one has an up-front screening process to weed out what makes it into the gallery. "Unmounted prints or slides". They're actually pretty explicit on this part of the requirements, and even bother to mention that submitted materials will not be returned. Three 8.5x11 prints and $45 in submission fees later, and I'm in.

Why three? I wanted to include at least one aerial, at least one traditional landscape, and at least one macro. Besides, I figured they'd can at least two of my shots, leaving only one to be printed large, matted, framed, etc.

Lesson #1 - If you submit it, you may have to print it.

Yep, all three pictures made it through the screening. So how to prepare the gallery prints? 18x24 is the maximum size called out in the rules. But are these maximum linear dimensions, or is it a square inch kind of thing? I punted on this question this year by submitting images that cropped well to that ratio, but some of my more printable pictures have 2:1 or even 3:1 aspect ratios. If it's a linear dimension limit, a 3:1 print would come out at 8x24. Historically, for this photo competition, every square inch counts and the larger the prints typically the more favorable the judging. Printing 8x24 would put any 3:1 panoramas behind the larger, more traditional aspect ratio prints. In the end I wound up printing 17x24 for one, and 18x24 for the other two. I'll wait 'till next year to submit panoramas. Printing for the three photos came out to $60.

Lesson #2 - Framing takes time.

Our submissions were due early in October, and we were supposed to have word whether our shots made it in by November 1st. Only none of us heard until closer to November 16th. Framed prints were due on December 1st, so that only left two weeks to print, mat, and frame the shots. I called the local frame shop, and they said there was a two week lead time on framing. Since I didn't have prints in-hand, that meant I had to find another way to get the framing done. In the end I wound up using an online framing supplier and bought Nielsen metal frames and mats cut to size. The supplier wouldn't ship glass through the mail, so I got acrylic.

When the package arrived I got busy. It wasn't until I'd started on my second print that I realized they'd cut all three mats to 17x24. With one week to go and no time to get replacement mats, I called the local frame shop to see if I could get them to at least make mats on a same-day basis. Lucky for me they were happy to do so. But because so many other people were getting prints framed for this competition, they were running low on certain supplies, like acid free mat boards. I got 6 ply mats instead of 4 ply, but they look nice.

Lesson #3 - Humidity is a bear

By the time I got the other two prints framed another fact of life in Hawai`i was staring me in the face: humidity. When I worked at the frame shop in Pennsylvania, any time we were doing archival framing we hung the prints in the mat using what's called a "linen hinge". Two pieces of acid free linen tape held the print at the upper two corners, and the print was allowed to drape across the mat aperture. This worked great, and when done properly would last for a hundred years or more. I did the same thing with my prints. Only with the huge humidity changes we get here, the print had expanded and buckled against the mat.

Times have changed, and now there are archival methods of dry mounting prints to acid free backer board. Next time I'll dry mount the prints and avoid the humidity issue.

Lesson #4 - Acrylic is fun for science projects

I had reservations about using acrylic. We did occasionally use it on super-huge prints when I worked at the frame shop, but for everything else we used glass. Getting glass clean can be entertainment itself, but conscientious application of Windex with a lint-free wipe usually got the job done. Still, we kept pieces of black velvet around to use as lint collectors once the glass was clean. On a bad day, it could take ten minutes or more to get a piece of glass ready. I heard there's a frame shop in Boston that bought up the cleanroom equipment from a chip manufacturer that closed its doors. That is a brilliant idea. If I ever go into the framing business myself, I'll follow their lead. The additional cost in HEPA filters is worth it.

Acrylic is a whole 'nuther ball game. It collects static charge the way kittens collect "Awwwww!"s. As soon as it's clean, something wants to stick to it. The very act of wiping dust off charges it even more. No matter what you do, the stuff is dirty. It's a pain. I did finally get the acrylic mostly clean, but it's not what I'd call a spotless job. Next year? Glass.

Lesson #5 - You have to show up

The framed prints are due in the gallery Monday the 1st. I've known this for over a month. They've been sitting in my office at work, ready to go. I could've handed them in Friday last week, but didn't. I wanted one more chance to see them before saying goodbye.

I've been scheduled to work at our remote facility, starting Monday the 1st. I've known this for a week. But somehow the two ideas didn't connect. Not until 2:30am Monday morning, anyway. I went from sleepy to bolt-upright awake in less than a minute, and even broke out in a sweat along the way. I still hadn't made caption cards, I still hadn't printed out the pricing cards. And they were in my office, not at home and certainly not in the gallery. I wouldn't get back into town until the gallery had closed. DOH!

I spent the next two hours printing cards, re-hanging the other two prints that were now suffering from humidity shifts, loading them into my wife's trunk, and trying to come up with a way to ask her to take my prints to the gallery. Now I'm going to go to work at our remote facility on about four hours of sleep. Next year? I'll plan to be in town when the pictures are due.

Lesson #6 - I know I'd do it again

Despite all the pain and anguish, I'd do it again in a heartbeat. I just hope all three prints sell. After everything I went through, I don't want a single one coming home with me.

-- Tom

Tuesday, November 18, 2008

Where Do I Go From Here?

Attaching the camera to the kite line is where things can get very very complicated, or very very simple, depending on what your requirements and expectations are. Please note the distinction between requirements and expectations. The two are usually quite different.

If you go through all of the KAP rig photographs on Flickr, you'll see there's a huge diversity in design from the very simple to the very complex. Depending on your requirements, most rigs fit somewhere in the middle.

Requirement #1 - I want to be able to take photographs from the air

This one is straightforward. Tie your camera's wrist strap to your kite line, start an intervalometer or set the self-timer, and let it fly. This is how some people have started, and when the kite line and the camera swing and the wind all play nicely together they have come back with some really good images. If you're after instant gratification with KAP, this route is tough to beat. But eventually most people who stick with KAP move beyond this.

Requirement #2 - I would like to know where the camera is pointing

This is where adding a suspension comes in. Through all the history of KAP, two suspensions have stood the test of time: the pendulum and the Picavet. That's not to say that other suspension methods can't work, and people continue to experiment. But if your aim is to get a camera airborne, experimenting before you have one flying is probably not the best bet. A pendulum is fairly straightforward: a rod that hangs down from the kite line with the camera attached to it. A Picavet suspension is a little more involved, but is also fairly easy to make or buy.

How you attach your camera to the suspension of your choice is where things start to get interesting. The simplest method is to attach the camera directly to it, either pointing horizontal (e.g. threading a pendulum or Picavet directly into your camera's tripod socket) or down (using a piece of angle).

Requirement #3 - I would like to point my camera some direction other than down or sideways.

At the very least, you'll need an extra pivot point that you can rotate your camera about. This can be very simple, such as using a slightly larger piece of angle and setting the tilt angle by rotating the camera before locking the tripod screw, or it can be more complex, such as building some sort of tilting frame.


Before going any further, it's worth mentioning that practically every aerial photograph can be taken with a rig that meets those three requirements. Fancy? No. User-friendly? Actually, yes. But does it let you make decisions on the fly as far as pan, tilt, or when to take your exposures? No. Still, not every KAP session needs that kind of flexibility. For a lot of KAP this is as far as you need to go. Past this point we're not discussing requirements so much as we're discussing expectations. You really can do excellent KAP with nothing more than we've already covered.


Expectation #1 - I want to be able to change where my camera is pointing on the fly.

This is where one of the major divisions in KAPing styles comes into play: RC-KAP vs. AutoKAP. Both involve adding motors to your rig. The easiest way to do this is to use off-the-shelf servos made for remote control aircraft. There are all manner of ways to incorporate these into a KAP rig design, ranging from direct drive to geared drive to push-arm, and everything in between. Rather than go through the list, take another look at the KAP rig photographs on Flickr.

Once your rig is motorized, you can either add an RC radio and do RC-KAP, or add a controller that will pivot and tilt your camera through a fixed set of orientations and do AutoKAP. Again, there are numerous options for accomplishing either of these.

Expectation #2 - I want to see what my camera sees before I trip the shutter.

We come, at the very last, to video feedback. It's odd how many people begin with this in their requirement list, and how few people doing KAP actually use it. The truth of the matter is that it is rarely cheap, it is rarely simple, and it adds a layer of complexity to doing KAP that is rarely needed.

That's not to say it doesn't have its place. If you are doing aerial photography as part of a portrait or model shoot, you don't have the option of getting your shots wrong. Likewise if you've been called in to do architectural photography and the customer has specified views they need to see in the images from the shoot, not having video feedback can be a huge gamble. But for the sake of going out and taking pictures of a place that's pretty, intriguing, and stands a good chance of being interesting from the air, it's hardly a requirement. Be sure you know what kind of KAP you plan on doing before insisting your rig has this capability. Chances are you don't need it, and the cost associated with it can easily be more than all your other KAP gear put together.


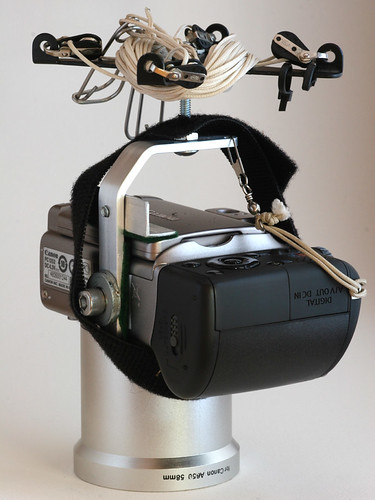
In closing, these are pictures of two of my three rigs at the moment:

Current Rig - Late 2008

The first is a two-axis rig that can either be run with an AutoKAP controller, or with an RC radio. In this shot it's configured with the radio. Most of the parts came from Brooxes in the form of a BBKK kit with a set of PeKaBe blocks on the Picavet, and a reduction gearbox on the pan axis. It's relatively heavy, it requires the operator to fly a kite while aiming a camera, and it's one of the more expensive ways to get into KAP.

Lightweight Rig - Ready to Fly

The other is a down-only rig, using the same camera. It has no radio, no servos, no ability to control the camera in flight except by walking around or letting out more or less kite line. All of the parts except the camera and Picavet came out of my scrap box at home, and took less than an hour to assemble. It's relatively light, it puts no additional burden on the operator besides that of flying the kite, and except for the camera and Picavet, it was essentially free. With one slight change it could be made to let the camera tilt anywhere from straight down to horizontal.

Both produce good pictures from the air. Both meet requirements #1 and #2 above. The RC rig also meets requirement #3 as well as expectation #1. Neither meets expectation #2. These two rigs have produced 99.99% of my KAP photos.

As for where to start, only you can decide. Many people start simple. Some of them migrate to more complex rigs, but others don't. Other people start complex. Some of them migrate to simpler rigs, but others don't. It's an individual decision that only you can make. But in the end the objective is the same: Attach a camera to a kite line, and take pictures from the air.

-- Tom

Sunday, November 16, 2008

What Camera Should I Buy?

"What camera should I buy?"
This question is asked at some point in practically every photography-related forum. Usually the question is answered by a whole string of people whose responses take the form of:
"I use [insert camera model X] and LOVE it! You should get the same thing! You won't be disappointed!"
Unfortunately the plain fact of the matter is that you might very well be disappointed because their needs may not match your own, regardless of whether you're doing photography on the ground or from the air. There are no simple answers to this question. Ever.

With KAP, there are a number of considerations you might want to look at, depending on what you plan to do with your rig. A generously wide field of view is a common concern, as is the ability to trigger the shutter from an IR or electronic remote. Image quality and noise characteristics are another set of concerns that often go hand-in-hand. And of course there's the ever-present quest for more pixels without having to lose in any of these other areas.

But for KAP one of the overwhelming considerations is weight. This is not to say that light is always better than heavy, but no other characteristic of a camera will affect the rest of a person's KAP equipment more.

By way of example, there are two very successful KAP photographers who operate at two very different ends of this scale. One uses an ultra lightweight automatic rig. There is no radio transmitter, no receiver, only the camera, a servo for pan rotation, and a controller that will rotate the rig and take pictures. The rig is mostly flown from lightweight, high angle kites that let the rig be operated with a nearly slack line between the rig and the KAPer. This setup has produced numerous outstanding photos.

The other uses comparatively heavy medium format film gear. Because of the additional weight in the camera, it needs a substantially heavier rig to support it. The heavier rig and camera combination must then be hung from a kite capable of developing a great deal of pull. Larger kites cost more, so in addition to the more expensive camera hardware, the kite is also more expensive. Since this represents a large investment in airborne hardware, the safety factor in the line is higher, making for heavier line. In the case of this KAPer the line is also doubled so that in the event of a line failure there is a second line to take up the load. All of this adds to the cost. This setup has also produced numerous outstanding photos.

So which one is "right"?
And when Rabbit said, "Honey or condensed milk with your bread?" [Pooh] was so excited that he said, "Both," and then, so as not to seem greedy, he added, "but don't bother about the bread, please."
-- A.A. Milne, "Winne-The-Pooh"
There is no one right answer. Each is "right" for the photographer in question. Which more or less leaves someone interested in getting into KAP with no more information than they started with, which isn't entirely a fair thing to do.

Rather than leave things there, I'll share with you my own route into KAP. As for which camera I started with, I started with a camera I had on hand. In my own matrix of features versus trade-offs, it had the perfect combination: I already had it.

On the plus side, it wasn't that heavy. On the minus side, it had some oddball characteristics that didn't make it ideal for KAP. One of these was that it liked to turn itself off to save power, and there was no practical way to get rid of this problem. So I opted for an impractical way, and simply never stopped taking pictures the entire time the camera was in the air. I still lost a lot of shots because of this when the camera turned off mid-flight, but for the most part it worked.

My second KAP camera weighed twice as much, and increased my rig weight from 600g to 800g in one fell swoop. This impacted my ability to fly it. For starters, all of my kites needed more wind in order to lift the rig. But the wind range of the individual kites didn't change, so in essence this compressed their available wind range. For some kites, like my 6' rokkaku, it was hard to tell the difference. For others, like my Fled, it means I can't use that kite at all for this rig.

There are certainly lighter cameras available, but for what I wanted it was the right camera for the job. But the trade-off is that I have fewer opportunities to fly it. This can be addressed in several ways. One is to trade it in for a lighter camera. Another is to keep the heavier camera, but build a lighter rig. This is something I've done with this camera, and it wound up saving the day on a once-of-a-lifetime KAPing trip. Yet another way to address this is to get a new set of kites that will fly the heavier camera rig, and regain my wind range that way.

So even for a single KAPer, there may still not be a "right" way to go. It's a tough question that only you can answer for yourself. What camera is right for you? Only you can know.

Nonetheless, there are some things to look for in a KAP camera, though you won't necessarily get one camera that fits all of these:
  • Weight - I've already made the point that weight affects all other aspects of KAP. Unless you're ready to invest in larger kites, heavier line, etc. you might want to start light.
  • Field of View - Most of the time people look for wide angle cameras for use on kites. It's difficult to aim a camera with a narrow field of view, and tighter fields of view accentuate motion blur from rig swing. Wider, in this case, really is better most of the time.
  • Manual Settings - In addition to letting you choose your shutter speed and aperture, most cameras with manual settings also don't get to insistent about turning themselves off or putting themselves into some sort of power saving mode. It's worth checking both of these things.
  • Remote Triggering - Unless the camera has some provision for remote shutter release, the only way to get it to take a picture is to push the shutter button. This is not a show stopper, and all of my rigs but one use a servo as a "finger" to hit the button. But the ability to use an infrared or electronic release means one fewer piece of equipment to have to loft, and one more part of your rig that can't fall out of alignment.
  • Battery Life - Cameras with longer battery life are friendlier for KAP. If the camera burns a set of batteries in an hour, the only way to keep flying is to keep a lot of batteries on hand. Cameras that let you shut off the LCD, put the camera in a power saving mode that it can wake up from, or are otherwise stingy with batteries are a plus.
You've probably noticed I didn't discuss the one thing that most camera reviews go ga-ga over: how many pixels the camera supports. Depending on what you want to do with your images, this may not be a big deal. For posting on the web, cameras with more than 2MP detectors may not buy you much. But if you're planning to make big poster sized prints, higher resolution cameras are called for. If you're planning to make wall murals, digital cameras may not be the route to go. (Now you understand why that one KAPer uses medium format film gear!) This is a question only you can answer, and has very little to do with a camera's aptitude for doing KAP.

As for particular brands, you're in luck. I've used cameras and lenses that were made anywhere from the early 1900's all the way up to cameras that came off the line less than a year ago. There's a world of difference. In order for a camera maker to stay competitive, they really do have to turn out a top-notch product. Chances are, if you're familiar with the manufacturer's name, you can't go too far wrong. Every camera manufacturer does occasionally turn out a lemon, so it's worth checking the digital camera review sites. But as for which brand is the best? See the quote from Winne the Pooh up above. But don't bother about the bread.

-- Tom

Tuesday, November 11, 2008

"Go Fly a Kite!" or How to Get Started with KAP

In the hopes that the previous two posts have piqued your interest in KAP, and you're itching to get going, the following posts should help you on your way. But it's not a straightforward task, and there's a fair bit of work involved in order to get there. Don't worry, though. Most of it's actually a lot of fun. In order to start doing kite aerial photography, the first thing you need to do, quite literally, is go fly a kite.


Fled


This is one area where KAP differs from most other forms of photography. I can't describe how many times I've been out doing photography on the ground, and the light just didn't work, the weather wasn't right, the subject wasn't what I thought it would be, etc. The least extreme of these have been a whole series of incidents that begin with "Stop the car! Stop the car!" The most extreme involved lugging two camera bags and two tripods up a cliffside trail in Zion National Park and almost having to choose between losing the gear or losing the me when I stumbled. It was anything but fun, and resulted in not one usable shot.

KAP, on the other hand, always begins and ends with flying a kite. Even if the light's not right, even if the scene just didn't work out, you still get to go out and fly a kite. Early on, the typical KAPer will only own one or two kites, so situations will arise where they don't have the right kite for the wind they've been given. But much of the time the way this plays out is that there's plenty of wind for the kite, just not enough for the kite to lift the camera. In which case the entire outing isn't wasted, it just means you spent your time flying a kite rather than taking pictures.

I could point out all sorts of reasons why this is a good thing: You get the opportunity to research the wind available at this spot. You get to decide if shooting here is worth buying or making a lighter or heavier wind kite to add to your stable of kites. You get to see if the wind direction available here gives you the access you want for your subject, or if you need to find a better spot to fly from. But the real reason is that flying kites really is fun, regardless of whether you have a camera on your kite line or not. For this and for so many other reasons, KAP begins, ends, and depends on a real enjoyment of flying kites.

But not any kite will do. It's an unfortunate truism that most of the kites sold these days are, aerodynamically speaking, disasters. It doesn't matter how cool a kite looks, or if it has wings that really flap (really!), or that it has your favorite anime character silk screened across the sail. Most of the time the kites that are designed with these features in mind will set aside other features, like stability, lift, durability, ease of assembly, etc. in order to achieve their artistic goals. What you are left with is a kite that looks great pinned to the wall, but one that will happily fall right out of the sky if used as a kite.

A good KAP kite requires a couple of things:
  • It needs to be able to fly - This should go without saying, but it also means that kites from practically any place but a dedicated kite shop or kite maker really won't fit the bill.
  • It needs to be stable in the air - This is where you start narrowing down the available designs. Not every design is a stable flyer. With KAP, your kite is your tripod in the sky, so you need to use stable kites.
  • It needs to be able to lift your camera - If the kite never develops enough line pull to lift your rig, you won't be able to use it to take pictures from the air.
  • It needs to not develop so much lift that it's hard to fly - Ideally you want your kite to be able to lift your rig, but not much more than that. I like about a 4:1 ratio, but I'm conservative. Some people prefer even less pull, closer to a 2:1 ratio of pull to weight. If your kite is pulling 10:1 or 20:1, it's like trying to hold a truck back with a rope and still do photography. It's not fun.
I'd like to be able to list kite designs suitable to KAP, but that would be folly. Old designs are re-discovered, shortcomings in existing designs get addressed, and new designs are invented all the time. Any such list would instantly be out of date. Your best bet is to look into what kites people are flying for KAP, to find out what conditions they're flying them in, and to work from there. For my own part, I currently use two Flowforms, one for high wind and one for medium wind, a 6' rokkaku for lighter wind, and a Fled for lighter wind still. But other people use delta kites, doperos, tritons, calomils, pilots, and a whole host of others. And even this list leaves out all the modifications people have made to their kites to make them more suitable to KAP. Do your research. It won't be time wasted.

Once you've chosen a kite, go fly it. Find out what its wind range is, how it likes to be launched, what it does when it gets too much wind, what it does when it gets too little. Does it like to over-fly zenith? If so, how does it recover? Does it have any tendency to turn to one side or the other in a gust? And how does it recover from that? There is an endless list of quesitons you can only answer by getting out with your kite and flying it.

But it shouldn't be an onerous task. After all, kites really are fun to fly. And if they're not, maybe KAP is the wrong choice for you.

-- Tom

Friday, November 7, 2008

KAP - What's the Point?

Before launching into the hows the whys and the whatfors of doing kite aerial photography, or KAP, one question that should be laid to rest early is:


"What's the point of hanging a camera from a kite line?"


The answer to which is: "What's the point in putting a camera anywhere?" The answer to that question is, "To take a picture from a particular vantage point." It's no different with a kite.

Photography is photography whether you do it from a tripod, from a hand held camera, or from the air. The whole point is to capture an image that shows the world from the vantage point of the photographer's choosing, showing a view of the photographer's choosing, and portraying the fall of light, shadow, and color as the photographer chooses. What a kite specifically offers is a vantage point that would otherwise be unavailable.

Which raises the next question:


"Why not just use an airplane?"


Kite aerial photography and airplane aerial photography really fill two very different needs, and a photographer who can utilize both is very fortunate indeed. In the United States, FAA regulations require airplanes and helicopters to stay at least a thousand feet above the ground over populated areas. If the vantage point you're after is between a thousand feet and several tens of thousands of feet above the ground, the airplane is probably your best bet. But if you're after a vantage point somewhat lower than that, you're out of luck.


"Why not just use a tall pole?"


You can, and many do. But even poles have limits. I use two, a 16' and a 25' hand held pole. Some photographers use hand held poles considerably longer than mine, and there are commercially available photography masts that can reach 100' above the ground. If you're after a vantage point higher than that, once more you're out of luck.

Kite aerial photography fills a gap in the list of available vantage points. Between the top of the pole and the bottom of the airplane, it's practically the only game in town.

Another advantage to KAP is that of cost. These alternatives are not cheap, nor are they typically portable or convenient. A 100' mast needs to be mounted in a vehicle of some sort in order to insure stability. This is an operation costing several thousand dollars, and few if any amateur photographers would get that kind of modification done to their own car or truck. Likewise, few photographers own their own airplanes or helicopters or have the resources to hire one that will give them ideal shooting conditions, like removing windows or doors, etc. By way of comparison, the entire contents of my KAP bag cost less than a two hour helicopter flight, and a small fraction of what a 100' mast would cost, and there are altitudes available to my KAP equipment that aren't available using the alternative methods.

Finally, KAP is convenient. Except for framed kites, my gear all packs into a single bag that still leaves room for food and water. By car or by foot, I can take it anywhere I could pack an SLR camera bag and tripod. If I need to move a little farther over to get the shot, I don't have to worry about roads for my mast truck. If the light is making and I need to stay a little later I don't have to worry about fuel or rental fees on an airplane or helicopter. And if I'm out walking and see a neat subject for a shot, I don't have to plan for an airplane or try to figure out how to get a mast truck into position. I can simply get a kite up, clip the camera on, and be shooting in minutes.

So what are you waiting for?

-- Tom

Thursday, November 6, 2008

The View Up Here

For a long time I had a blog called The Tiny Machine Shop where I described some of the projects I did in the machine shops at work, and in my shop at home. But I found I spent more and more of my time out in the field doing photography, and so the blog was gradually taken over with photography posts rather than machining posts. In the end I wound up changing the name of the blog, if not its URL, to reflect this new direction.

Now we've come full circle, and I expect to be spending more time in the shop and a little less time in the field. Rather than confuse things by changing all the names back, I'm starting a new blog strictly for photography. More specifically, this blog is going to focus on aerial photography done with cameras hanging from kite strings.


Lightweight Rig Airborne


I hope, through the months and the years, to convince you that this is not a crazy idea, it's not a wacky fad that will surely pass, and is actually a very valid, very safe form of photography.

What is photography, except a way of selecting a scene, choosing a vantage point, and recording an image to share with others? What is a vantage point, except a place to put a camera? Be it on the ground, on a tripod, in the hand, on a ladder, or even hanging from a kite, there's really no difference. It's a place to put the artist's eye so they can create the image that caught their fancy.

Since this is a new beginning of sorts, please bear with me as I describe the gear I use, the techniques required to use it, describe safe practices, and try to convince you to hang your camera from a kite. If you are coming here from my other blog, this may be old information. If you've been doing kite aerial photography yourself, it will certainly be old information. But if you're a first time reader, preferably with a bent for photography already, you might find something new. I hope you will read on.

-- Tom